Building your ADU in San Diego typically takes 12-18 months from start to finish. You’ll spend 2-3 months in the pre-planning phase, followed by 4-6 months for design and permitting. The construction phase requires 6-9 months, depending on your project’s complexity. Weather conditions, material availability, and inspection schedules can impact your timeline. Understanding each phase’s requirements and potential challenges will help you plan a successful ADU project.
Key Takeaways
- The total timeline for building an ADU in San Diego typically spans 12-18 months from initial planning through final inspection.
- The pre-planning phase requires 2-3 months for property research, site assessment, and professional consultations.
- The design development and permitting process takes 4-6 months to secure necessary approvals and finalize construction plans.
- The construction phase lasts 6-9 months and includes foundation work, framing, utility connections, and interior finishing.
- Weather conditions, material availability, and inspection scheduling can significantly impact the project timeline.
Understanding San Diego’s ADU Timeline Overview

The journey to building an ADU in San Diego typically spans 12-18 months, from initial planning to final inspection.
You’ll spend the first 2-3 months in the pre-planning phase, researching requirements and consulting professionals.
The design and permitting phase takes 4-6 months, including architectural drawings, engineering plans, and city approvals.
Construction usually requires 6-9 months, depending on your project’s complexity and contractor availability.
Throughout this timeline, you must coordinate with various stakeholders, including architects, contractors, and city officials.
Factor in potential delays for weather, material availability, and inspection schedules.
Pre-Planning and Site Assessment Phase
Before breaking ground on your ADU project, a thorough pre-planning and site assessment sets the foundation for success.
You must evaluate your property’s dimensions, setbacks, and soil conditions. This phase typically takes 2-4 weeks.
Start by checking zoning restrictions and gathering property documents.
Have a surveyor assess your lot’s topography and locate utilities.
You’ll also need to determine if your site has any geological challenges or drainage issues.
Consider consulting an architect or ADU specialist during this phase.
They can help identify potential obstacles and recommend solutions before you invest significant time and money into detailed plans.
Design Development and Documentation

Once you’ve assessed your property’s potential for an ADU, you must develop detailed plans that meet San Diego’s specific building codes and zoning requirements.
Your design process should start with preliminary sketches and conceptual layouts, considering factors like room configurations, utility connections, and exterior aesthetics.
Your construction documents must include complete architectural drawings, structural calculations, Title 24 energy compliance forms, and detailed specifications that will satisfy the city’s permit application requirements.
Planning and Concept Phase
Planning your ADU’s design begins with creating detailed documentation and drawings to guide the entire construction process.
You’ll need to work with an architect or designer to develop initial concept sketches, floor plans, and elevation drawings. These preliminary designs should reflect your needs, site constraints, and budget limitations.
During this phase, you’ll determine the ADU’s size, layout, and basic architectural features.
You’ll also need to consider factors like natural lighting, ventilation, and connection to utilities. Your design team will help evaluate material options and recommend sustainable building practices that align with San Diego’s climate and building codes.
Construction Drawing Development
After finalizing your preliminary design concept, you’ll need to develop detailed construction drawings that contractors will use to build your ADU. This phase typically takes 2-4 weeks and requires close collaboration with your architect or designer to create thorough documentation that meets San Diego’s building codes and requirements.
- Floor plans showing room layouts, dimensions, and structural elements
- Electrical plans detailing lighting, outlets, and panel locations
- Plumbing drawings indicating fixture placement and pipe routes
- Elevation drawings showing exterior appearance and materials
- Foundation and framing plans with structural specifications
Your construction drawings must include all technical specifications, materials lists, and detailed notes to guarantee proper execution during the building phase.
Permit Documentation Requirements
Before submitting your ADU plans to the City of San Diego, you must prepare a detailed permit application package that meets all local requirements.
Your package must include completed building permit forms, architectural plans, structural calculations, Title 24 energy calculations, and a site plan showing setbacks and utility connections.
You’ll also need to provide documentation for zoning compliance, fire safety measures, and drainage plans.
Don’t forget to include your contractor’s license information, property owner authorization, and school district fees.
A thorough checklist and working with experienced professionals will help guarantee your permit package is complete and accurate.
Permitting Process and Requirements
To legally build an ADU in San Diego, you’ll need to navigate the city’s permitting process and meet specific requirements.
You must submit your application through the city’s Development Services Department and obtain approval before starting construction. The process typically involves plan review, zoning verification, and compliance checks.
- Complete a preliminary review meeting with city planners
- Submit detailed construction drawings and site plans
- Pay all required permit fees and impact assessments
- Schedule and pass required inspections throughout the construction
- Obtain a final certificate of occupancy upon completion
Though complex projects may take longer, the city aims to process ADU permits within 5-7 business days through its expedited program.
Site Preparation and Foundation Work

Before breaking ground on your San Diego ADU, you’ll need a thorough soil test to guarantee proper foundation design and meet local building codes.
You’ll then move through the grading and clearing phase, where your contractor will level the site, remove obstacles, and establish proper drainage patterns.
The foundation work typically spans 2-3 weeks, including excavation, forming, rebar installation, concrete pouring, and curing time.
Soil Testing Requirements
Proper soil testing is an essential first step in your ADU construction journey in San Diego.
Before breaking ground, you must hire a certified geotechnical engineer to evaluate your soil’s composition and bearing capacity.
- Soil borings typically reach depths of 10-15 feet to assess subsurface conditions.
- Tests determine soil expansion pot, and initial seismic stability analysis identifies potential hazards like underground water or unstable fill.
- Results influence foundation design and structural requirements
- Most soil reports take 2-3 weeks to complete
The city requires soil testing documentation with your permit application.
If you’re building in areas with known geological challenges, additional specialized testing may be necessary to guarantee your ADU’s long-term stability.
Grading and Clearing Process
Once your soil testing results are approved, the grading and clearing phase kicks into high gear.
You’ll need to remove vegetation, rocks, and debris from the construction site to create a level surface for your ADU’s foundation.
Your contractor will bring grading equipment to adjust the terrain’s elevation and slope. Depending on your lot’s condition and size, this process typically takes 2-3 days.
They’ll also install temporary erosion controls and drainage systems to prevent water accumulation.
After grading, your team will mark the building footprint and dig trenches for utilities and foundation elements.
This critical prep work guarantees a stable base for your ADU.
Foundation Timeline Breakdown
The foundation phase of your ADU project spans approximately 3-4 weeks and consists of several key stages.
You’ll need to coordinate with your contractor to guarantee each step meets local building codes and passes inspection before proceeding to the next phase.
- Form installation and layout marking (3-4 days)
- Steel reinforcement placement and inspection (2-3 days)
- Underground plumbing and electrical rough-in (4-5 days)
- Concrete pouring and finishing (1-2 days)
- Curing period for ideal strength (7-10 days)
Weather conditions during this phase can impact your timeline, so it’s vital to schedule foundation work during San Diego’s typically dry periods to avoid delays and guarantee proper curing.
Construction Phases and Milestones
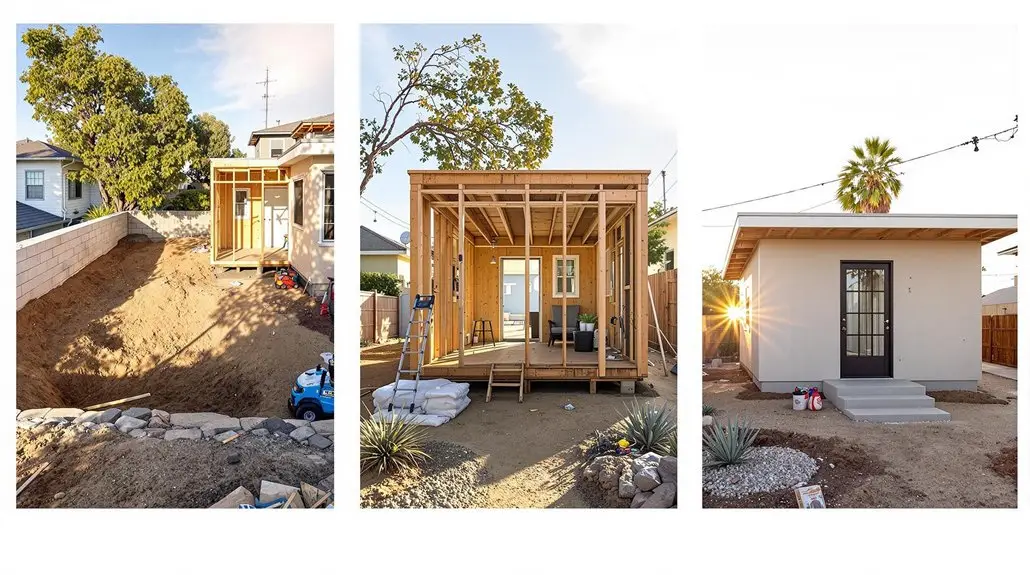
After securing all necessary permits, constructing your ADU involves several phases that typically span 4 to 6 months.
You’ll start with site preparation and grading, followed by 2-3 weeks of foundation work.
Next comes framing, which adds the basic structure over 3-4 weeks.
Roofing and exterior finishing require about 2 weeks, while rough electrical, plumbing, and HVAC installations take 3 weeks.
Interior work, including drywall, flooring, and fixtures, spans 4-5 weeks.
Final touches like painting, landscaping, and inspections need 2-3 weeks to complete.
Each phase builds upon the previous one, creating a sequential workflow.
Utility Connections and Infrastructure

Connecting your ADU to essential utilities requires careful planning and coordination with local service providers.
You’ll need to work with SDG&E to connect power to the city’s water department for plumbing and guarantee proper sewage hookups. Depending on permit approvals and contractor availability, these connections typically take 2-4 weeks to complete.
- Electric meter installation and service panel upgrades
- Water line extensions and meter installations
- Sewer lateral connections or septic system modifications
- Gas line installations (if applicable)
- Communication lines for Internet and cable services
Remember to factor utility connection costs into your budget, which can range from $5,000 to $15,000 depending on your property’s infrastructure and distance from main service lines.
Interior Finishing and Fixtures
Once construction reaches the final phase, selecting interior finishes and fixtures becomes your next essential step in creating a comfortable, functional ADU. You must choose materials and components that balance aesthetics, durability, and cost.
| Element | Options |
| Flooring | Vinyl, laminate, tile, hardwood |
| Lighting | Recessed, pendant, sconces, LED |
| Cabinetry | Stock, semi-custom, custom-built |
| Appliances | Standard or compact-sized models |
Remember to coordinate delivery times with your contractor to maintain the project schedule. Consider energy-efficient fixtures and sustainable materials that will reduce long-term operating costs. Your choices should complement the main house while retaining the ADU’s distinct identity.
Final Inspections and Compliance

Before your ADU can welcome its first occupants, you must pass several critical inspections to confirm compliance with San Diego’s building codes and safety regulations.
Schedule your final inspections at least two weeks before and ensure all documentation is ready for review.
Key inspections you’ll need to pass:
- Building safety inspection covering structural integrity and fire safety
- Electrical systems verification to confirm proper wiring and connections
- Plumbing inspection for water supply, drainage, and ventilation
- HVAC inspection to verify heating and cooling functionality
- Final zoning compliance check to confirm setbacks and height requirements
Once you’ve cleared these inspections, you’ll receive your Certificate of Occupancy, allowing legal use of your ADU.
Factors That Can Impact Your ADU Timeline
While obtaining final inspections marks a major milestone, several variables can alter the completion timeline of your ADU project.
Weather conditions, especially San Diego’s rainy season, can delay construction. Supply chain disruptions might affect material availability, while labor shortages can slow progress.
Your contractor’s current workload and scheduling conflicts may impact the timeline. Unexpected site conditions, like soil issues or utility complications, often require additional resolution time.
Your own decision-making speed regarding design changes and material selections will influence progress. Local permit processing times can vary based on application volume and building department staffing.
Frequently Asked Questions
Can I Rent Out My ADU on Airbnb in San Diego?
You can rent your ADU on Airbnb in San Diego, but you’ll need to follow specific regulations.
You must obtain a Transient Occupancy Registration Certificate and pay the required taxes. The ADU must meet safety standards and building codes.
Keep in mind that some neighborhoods have restrictions on short-term rentals, so you’ll want to check your local zoning laws and HOA rules before listing.
What Are the Current Tax Implications of Building an ADU?
Building an ADU can impact your taxes in several ways.
You’ll need to account for increased property taxes due to the added value of your property.
If you rent out the ADU, you’ll have to report rental income on your tax returns, but you can also deduct expenses like maintenance, insurance, and depreciation.
It’s wise to consult a tax professional, as there may be local tax incentives or specific regulations in San Diego.
How Much Can I Charge for ADU Rent in San Diego?
ADU rental rates in San Diego vary considerably based on your location and unit specifications.
You’ll typically be able to charge between $1,500 to $2,500 per month for a standard ADU.
If you’re in prime areas like La Jolla or Pacific Beach, you could command higher rates up to $3,000.
Your rental income potential depends on the unit’s size, amenities, and proximity to popular destinations or transit hubs.
Will an ADU Significantly Increase My Property Insurance Costs?
Adding an ADU will likely increase your property insurance costs, but not considerably.
You must update your policy to cover the additional living space and its contents. Typically, you can expect a 15-25% increase in your premium, depending on factors like the ADU’s size, construction quality, and intended use.
It’s best to contact your insurance provider for a specific quote before construction begins.
Can I Build an ADU if My Home Has an HOA?
If you’re part of an HOA, you’ll need to carefully review your HOA’s CC&Rs (Covenants, Conditions & Restrictions) before building an ADU.
While California law generally supports ADU development, HOAs can still impose certain restrictions on them, especially in common interest developments.
You’ll need HOA approval to guarantee your plans comply with their architectural guidelines.
If your HOA denies your request, consider consulting a real estate attorney.